Frequently asked questions on laminate floors

Product

Zenku floors are manufactured in accordance with European standards (according to EN 13329) and also with the CE marking label according to EN 14041.


As defined in the EN 316 standard, Zenku floor is made of a high-density fiberboard (HDF) panel.


The top layer is made up of a cellulosic sheet with particles of Aluminum Oxide or Corundum called OVERLAY. This high-quality layer provides an abrasion resistance that very few other products can offer. Meets all the requirements of the EN 13329 standard.


La siguiente capa, consiste en un folio decorativo, el cual se impregna con resinas amino plásticas, que imita a la perfección las distintas maderas o fantasías.


The backing layer is also an impregnated foil (with melamine) called Kraft. This layer has two functions: counterbalancing and isolation.

At Zenku we create floors that last over time, with exclusive and timeless designs, perfect for projects where creativity is prioritized above all.


To achieve this, we design quality laminate flooring that stands up to wear and humidity.


We use a high-density fiberboard (HDF) with high resistance to humidity, which, together with its anchoring click system, offers great tensile strength (both longitudinally and transversally).


Thanks to the application of the latest technologies, Zenku floors have perfect finishes. This means that they do not present deformations or the slightest variation in colour over the years.


To ensure that these parameters are met in all our products, Zenku has a quality team dedicated to control every single production process.

Zenku floors are produced with properties to prevent and help to eliminate static electricity from the rooms, promoting comfort in any situation.
Zenku floors from ARTEC and CREATION collections include “Aqua Tec” technology, which make these floors suitable for kitchens and bathrooms. As for LIVING collection, warranty is reduced to 5 years, and 3 years for 4V products.
Despite Zenku products have a high moisture resistance, it is not recommended to install laminate flooring in spaces with a high exposure to humidity (such as professional laundries, saunas, etc.).To avoid humidity, we must prepare the space properly before the installation of the floor. In addition, we must use an underlay with plastic film for isolation of the floor. Once installed, avoid humidity by dry cleaning or using vacuum and preventing the concentration of liquids.
Zenku floors have a high resistance, but a stove is an element that can generate a high wear in the surface due to the weight, the heat it radiates or the sparks that can leave little burning spots on your floor. Therefore, in case the floor will be installed near a stove, it is recommended to use an intermediate floor between the stove and the laminate floor. This underlay will protect your floor from any damage.
Yes, it is possible. But you cannot install Zenku laminate directly on parquet, wooden floor, laminate floor, carpet or vinyl floor.

Yes. Due to its composition, Zenku floors protect your home from allergens. All our products are antiallergic and antibacterial.

Yes, Zenku floors have a high resistance to abrasion produced by any type of chair with wheels. Even so, it is always recommended to use protective mats under your office chairs or use soft castors to reduce wear and tear and extend the life of your laminate floor.

Even though laminate floors are highly resistant, neither Zenku floors nor another laminates are suitable for outdoor installation due to the influence of the environment on the wood fiber core.

Yes, but always bearing in mind the installation indications for being used with underfloor heating or cooling.


Aspects such as the maximum heating temperature or the condensation caused by the cooling system are very important to enjoy the floor for many years.

Installation

You can calculate the number of boxes you need by dividing, the total square meters you need by the number of square meters of flooring that each box contains. Once calculated, an additional 10% is added to cover the possible losses and waste generated by the installation.

There are currently many options on the market, so to choose the best underlayment for your project, the level of use and environmental conditions must be considered.


In addition, it is important that it meets some minimum conditions (not to exceed 3 mm thickness, compressibility of at least 50 Kp). It must have a built-in vapor barrier and, in case it is not incorporated, it must be placed separately, especially in new construction or areas where there is humidity.
For subfloors up to 4cm thickness, you should wait one week per cm since the concrete is applied. If thickness is above 4cm, you should wait 2 weeks per cm.
It is recommended to start the installation from the longest wall and with the fewest irregularities to minimize squaring problems.
All materials are affected by atmospheric conditions, causing them to expand and contract. This phenomenon is accentuated in wood fiber-based materials. It is necessary to leave expansion joints to avoid possible swelling caused by expansion or possible joint damage caused by contraction.
These are the basic tools needed:
  • Manual saw, jigsaw or scroll saw.
  • Measuring tape, level, pencil, cuter and adhesive tape.
  • Spacers to keep distance between the walls and laminate floorboards.
In addition, for the installation of flooring around pipes, under door frames, for skirtings and mouldings you will need:
  • Crowbar, miter saw, screwdriver, electric saw, square and D3 white glue (glue for wood).

For a proper installation of a laminate floor, it is very important to place the accessories so that the installation complies with the manufacturer's instructions.


Placing an expansion profile or any other profile is very easy.


Those profiles are provided with a plastic base that we must fix to the floor by using screws. This is the first step before starting the installation.


The laminate floor should be installed once these plastic bases are fixed where needed: in doorways, in wide spaces, etc…


When the plastic base is reached by the laminate, it is essential to leave 10mm between the last piece and the base as an expansion joint. In the same way, in case of continuing with the installation, another 10mm will be left from the plastic base to the first plank.


Lastly, we need to apply several dots of mounting adhesive inside the gutter of the plastic base to properly fix the profile to it.


The profile will completely hide these expansion joints and finish off the installation.

If you have an irregularly shaped wall, it may be necessary to trim the first row of planks.

When the first three rows of planks are assembled, placed them close to the irregular wall maintaining 10 mm perimetral joint.

Then we create a small piece with a hole 5 cm far from the edge (this distance varies depending on the irregularities of the wall).

We will use this piece as a guide by running it along the wall with a pencil placed in the hole. This way, we will translate the irregular shape of the wall into the group of planks.

Once marked, we will disassemble the pieces to cut them one by one and shape the planks.

When the planks are trimmed, we will assemble them again in the same order and we will place them against the wall, leaving the 10 mm perimetral joint. This process can also be applied in case of having irregular walls in the last row.


In case of having irregularities smaller than 10 mm:

  1. Install all the planks of the last row without considering the 10mm perimetral joint.
  2. To replicate the irregularity of the wall in the planks, we create a piece with a hole placed 10mm from the edge.
  3. Once marked, we will disassemble the pieces to cut them. When the planks are trimmed, we will assemble them again in the same order.
  4. This will replicate the irregularity and it will maintain the 10mm perimetral expansion joint.

In case of having irregularities greater than 10mm:

  1. Placed the planks without assembling on the last row.
  2. We will make a piece with the hole distanced from the edge according to the irregularity of the wall.
  3. Once the planks are marked, we disassemble them, we cut them following the mark and reassembled in the same order.
  4. As a result, we will have a structure that maintains the 10mm perimetral expansion joint.

Place the planks up against the tubes and draw the cutting points. Drill out the holes for the tubes adding 20mm to the diameter of them.


If the holes must be made in the longitudinal direction of the plank, the cut must be made at 45º and if it is in transversal direction (short side), a straight cut will be made.


Once the two pieces have been separated, the plank will be placed around the pipe and the cut pieces will be glued. The hole that remains around the pipe does not have to be sealed, a trim can be placed to hide it.

It is not recommended. And, in case you do it, warranty will be void.

Maintenance

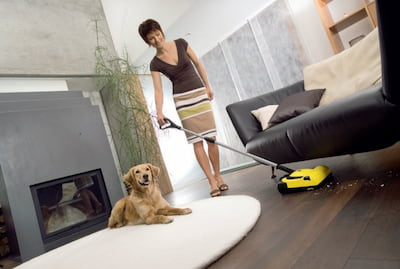
It is recommended to clean the floor with vacuum cleaner or mop. If necessary, use a damp cloth or mop with water and cleaning vinegar, wrung out very well.


Limpieza Suelo laminado

We recommend using cleaning vinegar (not to be confused with food vinegar). It is a disinfectant product and does not damage the floor.

Our floors include technologies and a special treatment that make them ultra-resistant to scratches. But maintaining some daily habits will help you to keep the floor in perfect conditions:

* Use a doormat at the entrance to remove dust, sand or grit stuck under shoes.

* Use chairs with soft castors and place felt protectors on chair and furniture legs.

* To make dragging heavier furniture easier and protect the floor, place a towel under them.

Thanks to our technologies, Zenku floors resist longer without filtering stagnant water than a standard floor. Even so, it is important that in event of a liquid spill, it is cleaned as soon as possible. Thus, you will avoid concentration of moisture in specific points.

It is recommended to clean with a sponge or an absorbent cloth. It will remove the liquid more efficiently and prevent it from spreading.

In case of being sticky liquids, clean the area with a damp cloth.
Replacing a specific plank is not an easy task, so we recommend contacting a professional. The procedure is as follows:

  1. Properly identify the contours of the damaged plank.
  2. Saw off the new plank vertically and horizontally to facilitate fitting.
  3. Using a jigsaw, make two cuts on the damaged plank, lengthwise. Make other two diagonal cuts from the corner of the plank till they cross with the cuts made previously.
  4. Carefully remove the damaged plank, being careful not to damage the rest of planks. Clean any sawdust and dirt residue.
  5. Apply glue to secure planks.
  6. Fit the new plank by clicking with the part you didn’t saw off and adjust it with a block and a hammer.
  7. Once the new plank is in place, spread weight over the plank for several hours to help with better fixation.

Was this article helpful?